Sunday, January 6, 2013

Cyclone Dust Separator

Just about any functioning woodworking shop has some kind of dust collection system. For some time now I have been using my shop vacuum to manage the saw dust in my workshop. This works fine initially but it doesn't take long before the filter starts to get clogged and the vacuum loses suction and effectiveness.
So, I needed to do something but didn't want to spend a lot of money. Not only did I not want to spend the money on a costly dust collector I don't really have the space for one. Well I was watching an episode of the 'Woodsmith Shop' and they did a short feature on a cyclone dust separator and that got me thinking. I started doing a little research by reading some articles online and found a simple cyclone separator on 'WoodworkingTalk.com' that I thought I could make myself and the version I used is loosely base off the one I found on there.

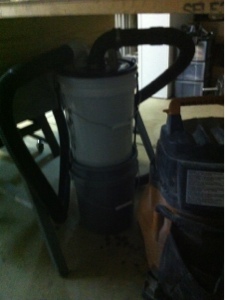
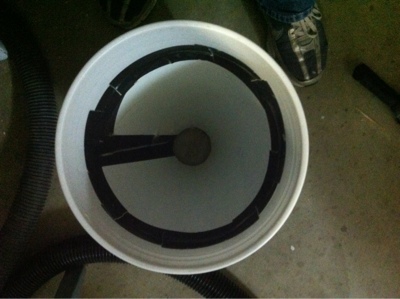
The system consists of two 5 gallon buckets and a few fittings. Within the top bucket there is a cone that funnels the particles down into the lower bucket through a 3" hole (which may be a little small-4" might be better). For the cone I had an old graphic that I formed into a cone and riveted together. This first version I made is more or less a trial run, if I should decide to modify it I will pick up a traffic cone and cut it down to fit into the bucket. Before I installed the cone I drilled the hole through the bottom of the upper bucket and the lid to the lower bucket. I then bolted the upper bucket and lid together and installed the cone and secured with some heavy duty tape. With the upper bucket & lid placed onto the lower bucket the bottom half is complete.

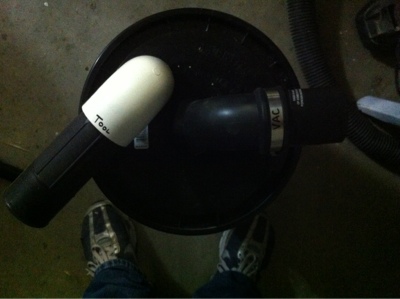
I used 2" PVC pipe for the down tube with a rubber elbow at the top. I couldn't find plumbing fittings that would fit the 2" vacuum hose fittings so the rubber elbow was an easy solution to make the transition. From the research I had done it appeared that the down tube extended down well into the cone. I don't know the exact formula for this but my version seems to be working well. As for the intake I drilled the hole as close to the edge of the lid as possible and used 2-90 degree fittings with a small piece of PVC between the two to create a 'u' shape. It seems that most of the diagrams I looked at show the dust intake either entering the side or coming in through the lid and making a 90 degree turn which I guess makes sense to initiate the rotation.
I got in a bit of a hurry and put this together without reinforcing the lid. With the hoses hooked up to the fittings the flimsy lid just isn't quite sturdy enough to maintain it's shape so if/when I upgrade my prototype I'll be reinforcing the lid.
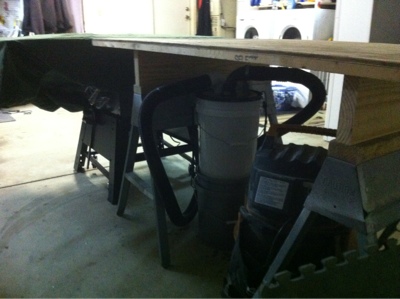
So far I've given this setup a couple good tests and it works quite well. It seems like the system is catching about 80% of the dust and particles which will go a long way in saving my shop vacuum. I also never noticed any loss in suction and that is probably the most important benefit.
That pretty much wraps up this entry thanks for reading.
Rex


Tuesday, January 1, 2013

Custom Oak Built-In

I recently built a custom oak built-in for a new client. It was both the largest and the finest built-in that I have undertaken to date. This project presented me with many challenges and learning opportunities along the way. Most of the built-ins that I have built have been painted, however this one was solid oak with book case uppers and cabinets with doors for the base cabinets.

I had originally planned to build this unit on site, but after giving it some thought I determined that it would be a better finished product if it were built in my shop and then installed on site. After another meeting with the homeowners to discuss details and take some detailed measurements I was ready to get started.

This built-in is wall-to-wall and floor-to-ceiling measuring 96" tall x 118" wide. I felt that it would look best if we divided the 118" into four sections to give the overall built-in proper proportions.

CONSTRUCTION
I started with the four book case uppers. The first thing I did was create the arch tops. The overall construction was typical cabinet construction except for the bottom of each unit as it did not have a bottom. I dealt with this by adding some temporary bracing to hold everything square and secure.

Next step in my process was to build the base cabinets. Rather than build four base cabinets I built two with a center divider in each giving the look of four cabinets which maintains the proper proportions. Once again the construction of the bases was typical cabinet construction. I also built doors for the base cabinets which isn't the first time I've built cabinet doors but it was the first time building doors of this style. They are a typical frame and panel construction with a Roman Ogee detail. I had to purchase the 2 piece router bit set to accomplish this and was pleased with the overall results. I did, however, learn a few tips and tricks that will be useful in the future.

The top for the base cabinets was solid oak. I used 2) 1x 12x 10' tongue & grooved together with a Roman Ogee edge. I couldn't be happier with how well the top turned out. I hadn't ever routed out a tongue and groove like this before and it turned out great and the top looks beautiful.

The final two pieces to complete the construction was to create the header piece and the crown molding. The header piece was just a 10' piece of 1x4 oak with a Roman Ogee detail and the crown was just a piece of store bought molding.

Each bookcase received 4 shelves and each base cabinet has 1 shelf. All shelving was completely adjustable using shelf pins with pre-drilled holes. I use strips of pegboard to duplicate accurate pre-drilled holes.

LIGHTING
Per the homeowners request I installed lighting in the tops of the bookcases. I picked up some under cabinet puck lights that I recessed into the tops of the bookcases. After final installation the lighting and wires aren't accessible so I made the tops of the bookcase removable in case there are ever any issues. There are 4 lights that are all daisy-chained together and plugged in to an outlet behind the base cabinets. I ran the power supply in between the middle two bookcases and added a switch in the third cabinet from the left so when you enter the room you don't see the switch.

FINISHING
The built-in was finished with a dark stain from Minwax. The homeowners had an old oak desk that they wanted to match so I actually had to pick up a couple different stain colors and create a custom color to get a good match. I'm a fan of polyurethane to seal and protect my projects so I used a Minwax clear satin fast drying polyurethane. I also like to thin my poly with mineral spirits, I feel like it makes for a smoother finish. All of the stain and poly were brushed on since I don't have a spray booth.

INSTALLATION
Installation day always makes me nervous and this install was no different. Although I knew all of my measurements were correct and I had a solid plan for the install I was still nervous. Well as it turns out, I had nothing to be nervous about, the installation went smoothly.
Part of what makes me nervous about the install is the transportation. But, again, this went off without a hitch and all components arrived on site unharmed.

We started by laying out drop clothes to protect the carpet as it was a rainy day. Next I removed the base board trim where the built-in was going. At this point we started installing the base cabinets. Once they were installed I moved on to the top for the cabinets. I made the top a couple inches too long so I could cut the ends to fit once on site. This was probably the one aspect that had me the most nervous, you only get one shot at this and if it's too short you'll have gaps and if your not careful you can damage the walls. Well, I made some careful calculations as to the slight "out of squareness" of the walls and the overall length and went for it. It was a perfect fit and I couldn't have been more relieved.

With the top installed I pre drilled the hole for the electrical and moved on to the bookcases. I started with the far right bookcase and worked my way to the left until all four bookcase were in and secured them all together. Once I had them all secured together I anchored them all to the wall and moved on to the finish trim.

We cut the header piece and crown molding to fit and installed them across the top of the unit. With these installed we moved on to the scribe moldings that were installed to cover up the small gaps on each end. I also had made up some moldings to finish off the seam between each cabinet. I had a hard time deciding whether or not to actually use them so I called in the homeowner and let her make the final decision. She chose to have the moldings installed and I think it was the right choice.

The last step of the installation was to wipe the entire unit down with some Old English furniture polish and install the shelves.

The install took about 5 hours to complete with the help of my step-son Jackson and my father-in-law Duane.

That wraps up this post, this was one of my most rewarding projects. Everything turned out great and the homeowner's expectations were surpassed.

Thanks for reading.
Rex


New Years Resolution

Happy New Year!!
This year one of my main goal is to keep up on my blogging, no more excuses. It seems that this past year I have had plenty to blog about but I just haven't had the time. Maybe it's more like I haven't taken the time but never the less I would like to do better this year.
This past year I had my most productive and profitable year focusing solely on my carpentry business. I made a few larger tool additions to my business and tackled some of my largest jobs. Some of these jobs required me to tackle things that I had never done before, of course, I didn't tell the client that but I learned a lot in the process.
So, as my business grows and my tool inventory grows, so too does my own skill set and experiences.
Thanks for reading and I hope to be writing again soon.

Sunday, November 27, 2011

TOOLS: New vs. used

As the owner of a growing carpentry company it seems like I am continually buying tools. Nearly every project provides the opportunity to add to my tool collection. Well, for the most part that suits me just fine since one of my favorite past-times is buying new tools.

However, new tools aren't always in the budget so over the past few years I have purchased several used items with good results. Of course, I would like to always buy new but when I can't, I have found that research and patience pays off.

My most recent used tool purchase (cordless framing nailer) was only about 1 year old and I was able to pick it up for about half the cost of new. I had been checking them out online, watching prices, etc for a couple months before I came across the one I bought.

I have a few key criteria when looking at pre-owned tools.

The first, as expected, would be price. I don't usually even give a used tool a second look if the price tag is more than half the cost of new.

The second criteria I look at is condition. Regardless of price, if a tool seems to be on its last legs, I don't think it's going to be a good buy. I also insist on being able to test the tool before I buy. At the very least I want to make sure it works and get a feel for the condition. I think you can feel the condition of a tool better than you can see it. Anybody can clean something up and make it look nice but, until you 'test drive' it you don't really know what your dealing with.

Next, I like to consider who owned/used the tool before and how they took care of it. There is no exact formula for this, whether it be a professional contractor or a weekend warrior, you never can predict how a tool was cared for, so I try to ask questions to get a feel for what kind of life the tool might have had.

One last requirement which, for me, is maybe the most important.  I would never buy a used tool 'sight unseen'.  I think you would be asking for trouble to buy a used tool online without being able to see it, feel it, and test it before making a purchase.  If a used tool can meet these requirements; price, condition & test drive, care, and an 'in person' purchase, then I usually feel comfortable about my purchase.

All in all, I think buying used tools can sometimes be the best way to go when you're on a budget like most of us are these days. However, you do kind of miss out on the rush of taking it home from the store and tearing into the box when you get home.

Now if you'll excuse me, I need to get back to the workshop.
Thanks for reading.
Rex

Wednesday, November 2, 2011

Christmas Tradition

Well, I haven't had too much to blog about these past couple weeks but this was emailed to me and I thought it was interesting so I thought I'd post it. I'm not sure of the original source but it is thought provoking. I certainly plan to keep these ideas in mind this Christmas Season.
-Rex

I think this is a wonderful idea. As Americans, we need to support
our own economy, and not be held hostage by cheap, foreign-made
products that are crippling the jobs of workers in the United States.
~~~~~~~~~~~~~~~~~~~~~~~~~~~~~~~~~~~~~~~~~~~~~~~~~~~~~~~~~~~~

Christmas 2011 -- Birth of a New Tradition

As the holidays approach, the giant Asian factories are kicking into
high gear to provide Americans with monstrous piles of cheaply
produced goods -- merchandise that has been produced at the expense of
American labor. This year will be different. This year Americans will
give the gift of genuine concern for other Americans. There is no
longer an excuse that, at gift giving time, nothing can be found that
is produced by American hands. Oh.... Yes there is!

It is time to think outside the box, people. Who says a gift needs to
fit in a shirt box, wrapped in Chinese produced wrapping paper?

Everyone -- yes EVERYONE gets their hair cut. How about gift
certificates from your local American hair salon or barber?

Gym membership? It's appropriate for all ages who are thinking about
some health improvement.

Who wouldn't appreciate getting their car detailed? Small, American
owned detail shops and car washes would love to sell you a gift
certificate or a book of gift certificates.

Are you one of those extravagant givers who think nothing of plunking
down the Benjamins on a Chinese-made flat-screen TV? Perhaps that
grateful gift receiver would like his driveway sealed, or lawn mowed
for the summer, or driveway plowed all winter, or games at the local
golf course.

There are a gazillion owner-run restaurants -- all offering gift
certificates. And, if your intended isn't the fancy eatery sort, what
about a half dozen breakfasts at the local breakfast joint. Remember,
folks this isn't about big National chains -- this is about supporting
your home town Americans with their financial lives on the line to
keep their doors open.

How many people couldn't use an oil change for their car, truck or
motorcycle, done at a shop run by the American working guy?

Thinking about a heartfelt gift for mom? Mom would LOVE the services
of a local cleaning lady for a day.

My computer could use a tune-up, and I KNOW I can find some young guy
who is struggling to get his repair business up and running.

OK, you were looking for something more personal. Local crafts people
spin their own wool and knit them into scarves. They make jewelry,
and pottery and beautiful wooden boxes.

Plan your holiday outings at local, owner operated restaurants and
leave your server a nice tip. And, how about going out to see a play
or ballet at your hometown theatre.

Musicians need love too, so find a venue showcasing local bands.

Honestly people, do you REALLY need to buy another ten thousand
Chinese lights for the house? When you buy a five dollar string of
light, about fifty cents stays in the community. If you have those
kinds of bucks to burn, leave the mailman, trash guy or babysitter a
nice BIG tip.

You see, Christmas is no longer about draining American pockets so
that China can build another glittering city. Christmas is now about
caring about US (We the People), encouraging American small businesses
to keep plugging away to follow their dreams. And, when we care about
other Americans, we care about our communities, and the benefits come
back to us in ways we could not imagine.

THIS is the new American Christmas tradition!!

Forward this to everyone on your mailing list -- post it to discussion groups.

-- throw up a post on Craig's List in the Rants and Raves section in your city.

-- send it to the editor of your local paper and radio stations, and
TV news departments.

This is a revolution of caring about each other, and isn't that what
Christmas is about?

Saturday, October 22, 2011

Custom Built-In

This week I've been working on a large custom built-in unit. The term 'Built-In' doesn't really do it justice. More like a built-in bookcase/entertainment center/fireplace mantle/storage unit. This thing is a beast, 8'tall x 9' wide.
If you read my last post you'll know that building something this large poses a few challenges for me. I've had to do a little re-arranging in the shop to make space for it but I'm managing.
I felt it made the most sense to take some careful measurements and build this unit in my shop(where all my tools are) as opposed to loading up my entire shop in the cargo trailer and building it on site. That being said, it was rather nerve racking transporting it all to the location. So, while I still think it made better sense to build it in the shop, the issue of transporting will play a larger role in my decision making process in the future. Everything made it safely to it's final location so, it all worked out in the end.
The built-in is made up of 6 modular units; a base(platform), 2 large base cabinets, 2 bookcases and a mantle piece that spans between the two bookcases. Each component was built to custom specs determined by the height and length of the wall and the sizes of the existing TV and electric fireplace. But the real customization came at the installation. There are only so many details that can be pre-determined, some things need to be accounted for on-site. Aside from accommodating some of the miscellaneous details, I also had to relocate the clients 60" flat screen. 1". It's kind of crazy but it had to be done. So, with the TV relocated and the fireplace set into place it was time to
move forward securing the cabinets. Once all the cabinets were set, it was time to install the shelves in the bookcases, install the base moulding and then, the crown moulding. And that was pretty much it. Final paint touch up was to be done by the homeowner. So, with that I packed up my tools, cleaned up,  took some photos and called it done.

Notable features include:
Doors for storage cabinet
Adjustable shelving
Crown moulding
Black Granite tile Hearth
Customized to fit TV & fireplace

Thursday, October 13, 2011

Workshop Set-up

Over this past weekend I spent some time in the workshop cleaning and organizing. My shop was on the verge of being over-run by scraps and sawdust, which is just the way I like it but, sometimes enough is enough. Not only is a messy shop an unsafe workshop, it is also a less productive workshop. So, while I may feel more at home being surrounded by sawdust and woodscraps, I felt it was time to clean up.
For me, doing a little shop cleanup ends up being more of an exercise in re-arranging and organizing my work space. It seems to be this never-ending quest to 'get it just right'.  I guess if you have a large enough workshop with designated areas set-up you may not be constantly trying to re-invent your space. However, I haven't quite gotten to that point. My workshop is in the garage of my home, which I also share with the laundry, workout area, bicycles, and storage. So, after all that, I have about a 10'x16' space to work in.
Most of my tools are on mobile bases, so they can be stored out of the way and rolled out when needed. This is pretty much a necessity in a smaller shop. Being able to roll tools that aren't being used out of the way is probably the only way I can make this small space work.  Having many of my tools on mobile bases goes a long way towards getting the most out of my space but it seems like I am still always struggling to find a good layout. 
I guess the biggest obstacle I have comes back to the limited space that I have.  My workspace is just fine for working on small projects, cutting small materials, making repairs etc.  It is when I go to build something large (like the large built-in I'm getting ready to begin) that I really start itching for more space.  I'll have the shop set up and organized just the way I want it and once the large project begins to take up more and more space I start re-thinking my layout. 
Maybe one of these days I'll come up with the perfect layout or maybe I'll come up with a larger dedicated workshop.  Until then, however, I'll just jump on here and vent.